Hardware Description Manuals
For the serial connection you need a RS232 adapter, either the simple for 3 wire▿ handshake or the 9600 baud▿ RTS/CTS one. If you don't have an EPROM cartridge you may want to build▿ it yourself.
RS232 Adapter
This RS232 is suitable for 3 wire handshake only and works with line speeds up to 2400 baud. All you need are these parts:
- user port plug
- MAX232, MAX232A, or MAX202
- 5 capacitors, each 1 µF for MAX232 or 100 nF for MAX232A or MAX202
- A SUB-D plug, 9 pins, male
Connect all these things in the right way:
  User port                                             RS232  9pins 25pins
                          _________
                         |         |
      PA2 M-----------11-|         |-14----------------- TXD  (3)   (2)
                     -10-|         |--7-
                     -12-| MAX 232 |-13-
    FLAG2 B---o--------9-|         |--8----------------- RXD  (2)   (3)
      PB0 C---'          |         |
                         |         |
      VCC 2------o----16-|         |
                 |       |         |
                 +       |         |--3--|+-,
                ---      |         |        |
                 |       |         |--1-----'
                 o----15-|         |
                 |       |         |
                 o--|+-2-|         |--5--|+-,
                 |       |         |        |
                 o--+|-6-|_________|--4-----'
                 |
      GND N------o-------------------------------------- GND  (5)   (7)
The RS-232 adapter now becomes connected to the host computer with a null modem cable. If you want to perform the RS232 adapter as a null modem cable itself, you can exchange the signals TXD for RXD. Instead of a male plug you need a female SUB-D plug then.
9600 Baud Interface
This is ↥Daniel Dallmann's 9600 baud interface. It works up to 9600 baud and supports RTS/CTS handshake. You need an additional 74LS00 with a 100 nF capacitor and a few connections more than for the simple interface.
User port                                             RS232  9pins 25pins

    VCC 2---o------14
            |      _|__           _________
            |     |    |         |         |
    PB1 D---+-o-1-| 74 |-3----10-|         |--7--------- RTS  (7)   (4)
            | '-2-| LS |         |         |
            |     | 00 |-5-,     |         |
    PB6 K---+---6-|    |-4-o--12-| MAX 232 |-13--------- CTS  (8)   (5)
            |     |____|         |         |
            +       |            |         |
           ---      7            |         |
            '-------o            |         |
                    |            |         |
    PA2 M---o-------+---------11-|         |-14--------- TXD  (3)   (2)
    SP1 5---'       |            |         |
                    |            |         |
  FLAG2 B---o-------+----------9-|         |--8--------- RXD  (2)   (3)
    PB0 C---o       |            |         |
    SP2 7---'       |            |         |
                    |            |         |
    VCC 2-----------+----o----16-|         |
                    |    |       |         |
                    |    +       |         |--3--|+-,
                    |   ---      |         |        |
                    |    |       |         |--1-----'
                    |    o----15-|         |
   CNT2 6---,       |    |       |         |
    PB7 L---'       |    o--|+-2-|         |--5--|+-,
                    |    |       |         |        |
                    |    o--+|-6-|_________|--4-----'
                    |    |
    GND A/N---------o----o------------------------------ GND  (5)   (7)
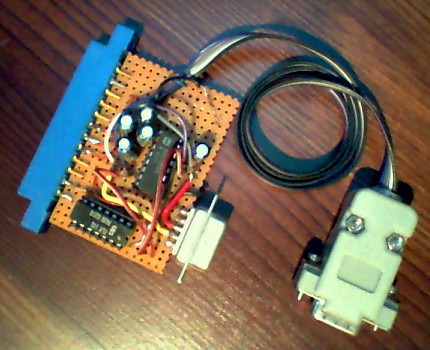
The RS-232 adapter now becomes connected to the host computer with a null modem cable. If you want to perform the RS232 adapter as a null modem cable itself, you can exchange the signals TXD for RXD and RTS for CTS respectively. Instead of a male plug you need a female SUB-D plug then. This is a combinated version, which supports both, a direct null modem connection or a standard serial connection. And here is another version, pimped with LED indicating the signal line states. And finally, you can gaze at an LED-pimped interface having even a housing here.
EPROM cartridge
To connect a 2764 EPROM to the expansion port of the C64 there is no additional hardware needed. Just connect the device as follows:
  Expansion port         EPROM
  ============================
   A0     Y -------- 10   A0
   A1     X -------- 9    A1
   A2     W -------- 8    A2
   A3     V -------- 7    A3
   A4     U -------- 6    A4
   A5     T -------- 5    A5
   A6     S -------- 4    A6
   A7     R -------- 3    A7
   A8     P -------- 25   A8
   A9     N -------- 24   A9
   A10    M -------- 21   A10
   A11    L -------- 23   A11
   A12    K -------- 2    A12

   D0    21 -------- 11   D0
   D1    20 -------- 12   D1
   D2    19 -------- 13   D2
   D3    18 -------- 15   D3
   D4    17 -------- 16   D4
   D5    16 -------- 17   D5
   D6    15 -------- 18   D6
   D7    14 -------- 19   D7

  -ROML  11 -------- 20  -CE

   Vcc
     2 or 3 ----o--- 1    Vpp
                o--- 28   Vcc
                '--- 27  -PGM

   GND A,Z, --o--o-- 14   GND
    1 or 22   |  |
              |  |
  -EXROM  9 --o  o-- 22  -OE

                     26   NC
The cartridge may look like this.